How to Enable Virtual Machine on I3, I5 or I7 Processors - Virtualization Concept
Hey friends, welcome back ! I am sure you all are missing me :) . I am not able to give ample amount of time to you guys because of my hectic schedule. But now you all have good news as i am back. In recent few months, many of my users havecomplaint that they are not able to use Virtual OS or Virtual machine on their Computers or Laptops. Because of this issue users are not able to install Backtrack Linux as Virtual OS on their machines. Today i will explain you how to enableVirtualization in your Machine.
Users having old processors i.e. before Intel's I series i.e. I3, I5 or I7 were not facing such issues because Virtualization was enabled by default but as the processors were upgraded major ROM manufacturers like Intel, Asus etc have made it an optional feature in their OS which is disabled by default. So whenever you try to install any virtual OS on your existing operating system you will get below error message:
Now you all must be confused what the hell is this Virtualization? Virtualization is a term that refers to the various techniques, methods or approaches of creating avirtual (rather than actual) version of something, such as a virtual hardware platform, operating system (OS), storage device, or network resources.
Now lets learn how to enable Virtualization on I3, I5 or I7 Processors or similar latest processors.
Steps to Enable Virtualization Technology:
1. Start your computer and immediately start pressing Esc button(or F1 or F2 accordingly as per your system) to go to boot options.
2. Now you will see some options like below:
Press F10 to go to BIOS setup.
3. After pressing F10 you will see something like below Main screen displaying details of your machine:
Now use arrow keys to navigate to System Configuration menu. You will see System Configuration menu like below:
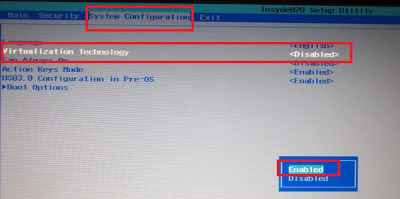
Now as we can see default value of Virtualization technology is Disabled. To enableit use arrow keys to reach Virtualization Tech and press enter then you will see something like below:
Select using arrow key and press enter to enable. Now after its enable you will see something like below:
Now save the settings by pressing F10 key and press enter.
4. That's all! Enjoy now Virtualization is enabled on your Computer.
Also learn how to install Backtrack Linux on virtual Box in Windows 7:
http://samsoftpk.blogspot.com/2013/10/how-to-install-backtrack-on-virtual-box.html
We hope you all have understood how to enable Virtual Machine on I3, I5 or I7 Processors or similar latest one's. If you face any issues in doing so, feel free to contact us by posting your response below.
 |
| Enable Virtualization |
Users having old processors i.e. before Intel's I series i.e. I3, I5 or I7 were not facing such issues because Virtualization was enabled by default but as the processors were upgraded major ROM manufacturers like Intel, Asus etc have made it an optional feature in their OS which is disabled by default. So whenever you try to install any virtual OS on your existing operating system you will get below error message:
This error message comes when Virtualization is not enabled on your Boot MenuSystem Configuration."This kernel requires an x86-64 CPU, but only detected an i686CPU"
Now you all must be confused what the hell is this Virtualization? Virtualization is a term that refers to the various techniques, methods or approaches of creating avirtual (rather than actual) version of something, such as a virtual hardware platform, operating system (OS), storage device, or network resources.
Now lets learn how to enable Virtualization on I3, I5 or I7 Processors or similar latest processors.
Steps to Enable Virtualization Technology:
1. Start your computer and immediately start pressing Esc button(or F1 or F2 accordingly as per your system) to go to boot options.
2. Now you will see some options like below:
 |
| Boot Menu Options |
3. After pressing F10 you will see something like below Main screen displaying details of your machine:
 |
| Main Bios Setup Menu |
Now use arrow keys to navigate to System Configuration menu. You will see System Configuration menu like below:
 |
| Default Virtualization Settings |
 |
| Enable Virtualization Tech |
 |
| Virtualization Enabled Yes |
Now save the settings by pressing F10 key and press enter.
4. That's all! Enjoy now Virtualization is enabled on your Computer.
Also learn how to install Backtrack Linux on virtual Box in Windows 7:
http://samsoftpk.blogspot.com/2013/10/how-to-install-backtrack-on-virtual-box.html
We hope you all have understood how to enable Virtual Machine on I3, I5 or I7 Processors or similar latest one's. If you face any issues in doing so, feel free to contact us by posting your response below.
How To Enable Virtual Machine On I3, I5 Or I7 Processors - Virtualization Concept - Tips And Tricks And Pc Games Full Versions >>>>> Download Now
ReplyDelete>>>>> Download Full
How To Enable Virtual Machine On I3, I5 Or I7 Processors - Virtualization Concept - Tips And Tricks And Pc Games Full Versions >>>>> Download LINK
>>>>> Download Now
How To Enable Virtual Machine On I3, I5 Or I7 Processors - Virtualization Concept - Tips And Tricks And Pc Games Full Versions >>>>> Download Full
>>>>> Download LINK l6